The Dog House Times Official Wood Plank Style Free Dog House Plans are here for free, courtesy of Dog House Times.
The Free Dog House Plans are your essential build plans to help you build your dog house quickly and cheaply. The dog house result is a beautiful plank-style dog house that would have cost you hundreds to purchase. Take pride in the accomplishment and cherish your dog’s house creation.
The build takes about 2.5-3 hours, not including wood preparation. Therefore, the Plank Dog House is the ultimate expression of cottage-style dog house life in your backyard.
The Universal Plans For A Dog Chalet
The Plank Dog House Plans can be used for any size dog. The plans are to be used with the data offered for free on the doghousetimes.com website. This data is for the dog house’s minimum recommended size. The dog house plans are for the basic build, but you can easily add to the build. See our DIY section on Dog House Times Dog Magazine to learn more about insulation, heating, cooling, excellent dog house door ideas, and more.
Materials You’ll Need For These Free Dog House Plans
- 2-3 wooden skids, decent condition
- 100 x 1” screws or nails
- 12 x 1/2″ screws
- 1 x board for the floor (see sizing chart for size)
- 2 hinges
- Paint or Stain
Tools You’ll Need
- Saw
- Measuring Tape
- Square
- Drill
- Screw Driver or Hammer (depending on whether you are using screws or nails)
- Paint Brush
The Free Dog House Plans
Step 1. Make a floor plate.
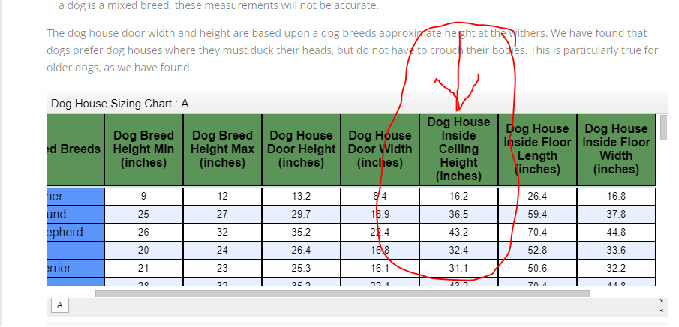
The length and width should be a minimum of the recommended sizes on the dog house sizing charts.

Step 2. Cut 9 pieces of plank
Cut 9 pieces of plank that are the length of the floor piece. Screw 2 of these pieces to the bottom of the floor. Ensure you pre-drill all holes because the wood will likely dry and crack if you don’t pre-drill. Save the other 7 pieces you cut for later.
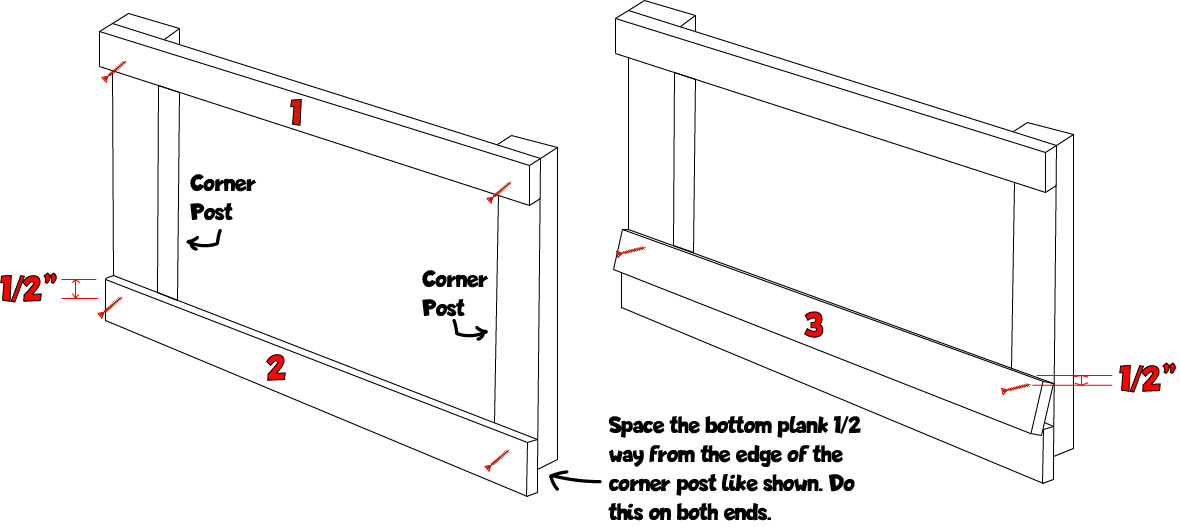
Step 3. Cut 6 House Corner Posts.
The 6 corner posts should be no shorter than the recommended Inside Ceiling Height found on the dog house sizing charts.
Step 4. Assemble Side Frames
Take 2 of the corner posts you just cut and lay them out in a parallel and square position. Now take 3 of the leftover boards you cut in step 2 and drill/screw them together as shown in the diagram below. Remember to pre-drill and place screws about 1/2” from the top edge of the boards so we can hide the screws. Make 2 of these (1 for each side). You will have 2 corner posts left over. Set these aside.
Step 5. Finish Side Assembly
Cut enough side planks to fill in the space. The number of planks you need will depend upon the height you make the sides. It should be no less than the inside ceiling height measurement on the size chart. Remember to screw about 1/2” from the top of each plank to hide the screw from the previous plank. Start with the bottom and work your way up. This way, each new plank overlaps the plank below, hiding the screws. Make Fill in both sides with these planks.
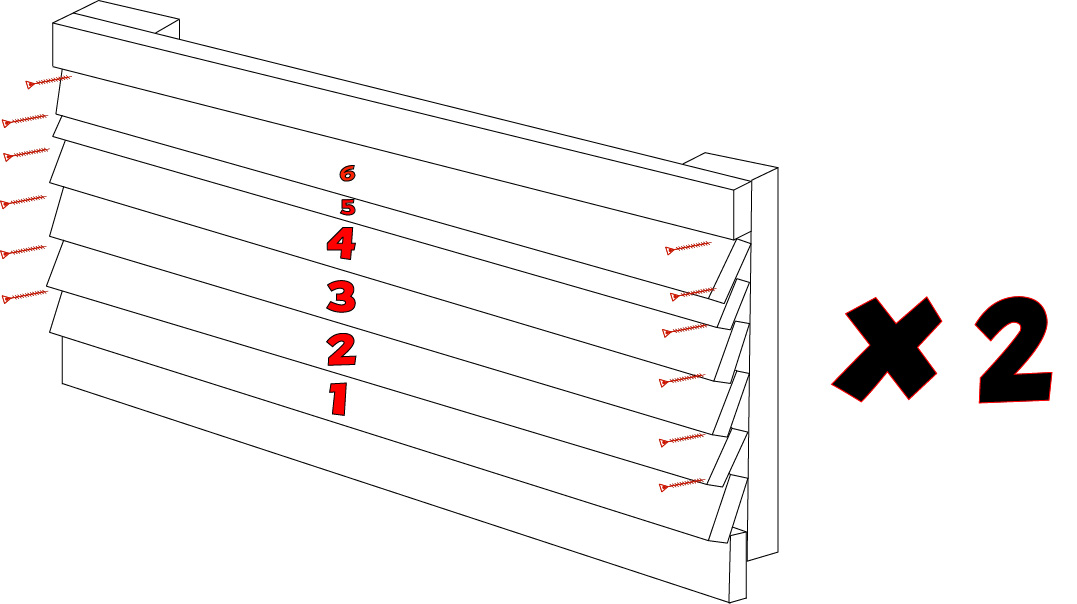
Step 6. Repeat Step 5.
Repeat step 5 with the other side frame you made in step 4. This will give you 2 side frames for your dog house.
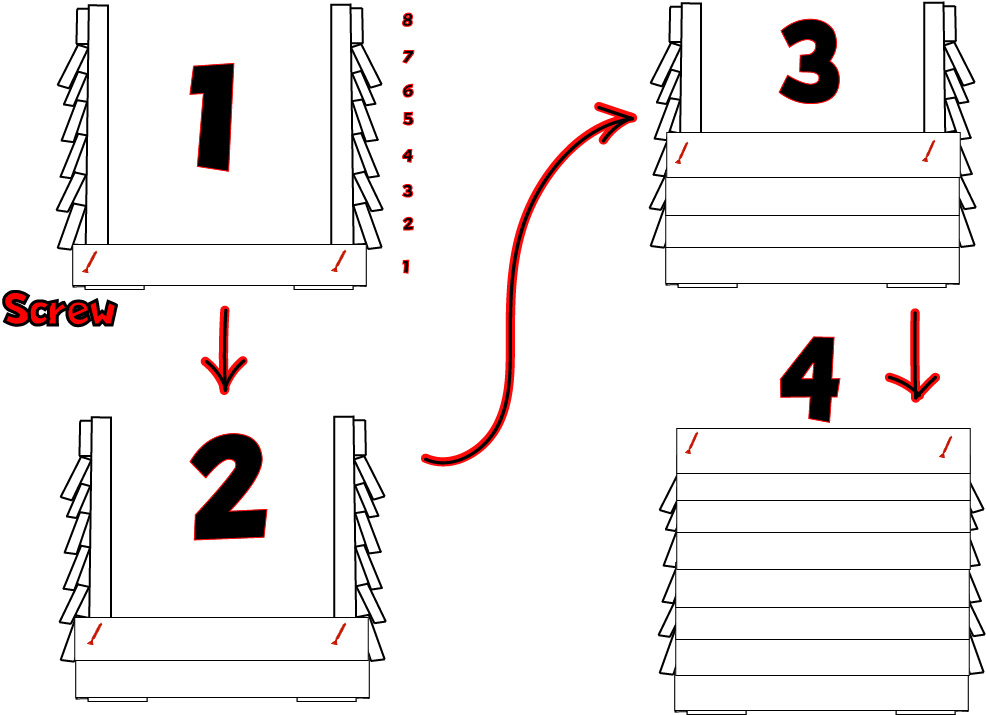
Step 7. Attach the sides to the base.
Attach the sides to the base as shown. Measure the outside width at the bottom of the dog house, just like in the picture here.

Step 8. Fabricate the back
Take the number you counted in the last step and cut that many planks at the measurement you measured in step 7. Like when you made the sides, screw the boards to the back, overlaying each board above to hide the screws.
Step 9. The Front Face.
We must return to the chart and retrieve our minimum door measurements. The door height is “H,” and the width is “Dw.” We will also need the measurement we got in step 7 and the number of planks counted in step 7.
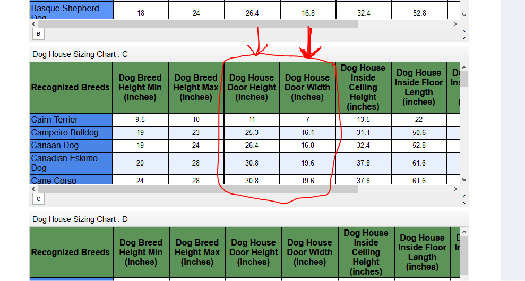
So once we have our door dimensions from the dog house sizing charts, we need to divide the door width “Dw” by 2. Set that number aside, and call it “Z.” Now take the width of the whole dog house “W” we measured in step 7. Divide that by 2 and subtract the number “Z” we set aside.

Here’s our formula: (W/2) – Z = X
So our resulting number X is the width of our side planks to either side of our doorway.
For H to correspond with the plank size, I usually just round up the door height “H” to match the nearest plank position. That way, no extra math is involved. Easy enough, right?
Step 10. Cut more planks
Count the planks you need on either side of your doorway, length “X.” Cut these and set them aside. Next, count and cut the top planks “Tp” at a length of “W,” as shown. Cut 2 extra pieces this length for step 13. Set these aside as well.
Step 11. Assemble the front face
Next, we make and put together the front face. Start by marking the “X” position on each side of the doorway.
Next, for Step A – secure (1) the first two bottom planks, pre-drill, and screw in place.
Step B – secure the top piece “Tp” by also pre-drilling and screwing in place.
Step C – may require a clamp or two. Clamp the 2’ corner posts’ leftover from step 4 and screw them in place as shown to the left. Once these are screwed together, you can remove your clamps.

Step 12. Complete the front
Proceed to complete screwing on the remaining front face planks.

Step 13. Determine the roof height
Next, we will take the last two pieces cut to the size W in step 10. Indeed, you can modify the roof pitch if you like, but for accessibility, I like to use a right-angle triangle. This makes our roof height super easy to determine. It’s simply 1/2 of “W.” For instance, let’s say that “W” = 16”. That would mean our roof height would be 8” in this example.
You will need a decent hand saw and miter box, or a miter saw to cut the angles right. If you want to wing it, be my guest, but I recommend at least using a pencil and ruler and measuring out your cuts to mark them appropriately. If you use my lazy method, remember that because we are working with 90 and 45 angles, the length of each side, on either side of the 90-degree angle, will always be the same.
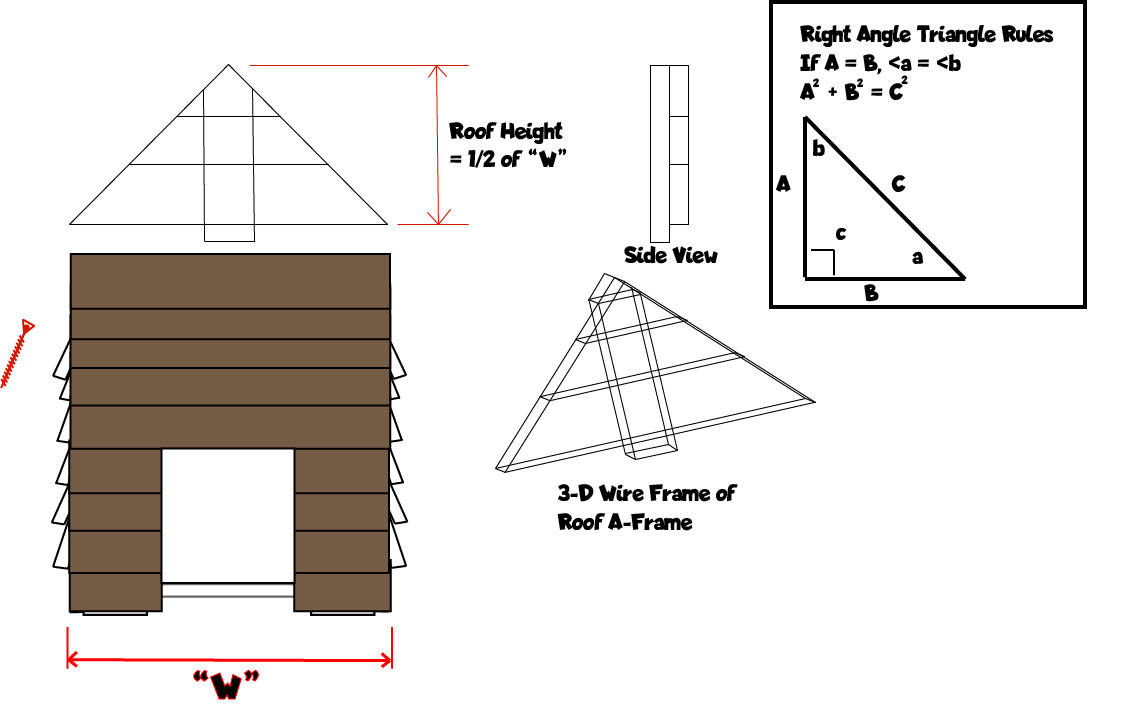
Cut 2 each of A, B, C, and D pieces where A = Roof Height, B = “W,” and use a ruler and pencil to mark out the remaining pieces until you make your entire triangular A-Frame pieces. Assemble to make 2 of each of these as shown in the wireframe drawing of one frame. Take your time during this step; it’s the most challenging step in building your dog house, so take your time.
Step 14. Assemble roof end pieces
Now we are almost done. Set your two triangular roof ends on top of the finished wall structure. Secure in place using 2 screws, pre-drilling, and installing on the extended vertical piece of the triangles as shown below.
Step 15. Assemble one side of the roof
Start boarding up one side only of the roof, as shown. You’ll want to cut your roof planks to be longer than the length of the dog house. This way, the roof will overhang both ends of the dog house. Go right to the top of one side of the roof. Only board up ONE SIDE of the roof. Make sure you cut double the planks to use them for the next step.

Step 16. Fabricate the opening side of the roof
Make a panel for the left side of the roof using the leftover planks from step 15. Cut 2 cross pieces that are the same length as the height of the opening of your dog house roof but cut them about an inch shorter than needed.

Step 17. Install the opening roof panel
Attach the roof panel using your 2 hinges. Pre-drill so you don’t split the wood. Notice how the roof panel with the hinges is extended at the top. This is to prevent rain from getting in along the hinge side.
Step 18. Paint or stain
Lastly, water-proof your dog house with a water-proofing stain or paint. Allow to dry thoroughly before you introduce your dog. Enjoy your dog house!

Conclusion
And that’s it. To sum up, if you study the plans ahead of time, the build time is about 3 hours. If you include 1 hour to get your materials and 1 hour to take apart the skids, then it takes to complete this dog house is 5 hours. However, you must leave the dog house overnight (at least) to allow the paint or stain to dry.
Tip: Add a piece of outdoor carpet to the floor inside the dog house. Cut it to size, and that way, it fits nicely inside. You’ll be able to easily lift it out and hose it down if it gets dirty. It also helps to insulate the floor for your dog.
Make It Universal
These universal free dog house plans also work for large and breed dog houses. The plans are universal. Therefore the plans even work for extra large dogs and extra large dog houses for extra large dog breeds. Any breed, no problem; we’ve thought of everything by combining 440 breeds’ data into our sizing charts. And this plan works like a charm for a lovely afternoon build to make a dog house that will shelter your dog for years to come.
Need Help? I Offer Support!
Just send me a message at:
doghousetimes@gmail.com or use the contact form here.
I also made an accompanying video that goes along with the instructions. Here it is:
You’re Going To Love These Dog House Articles
Dog House DIY Articles:
- Dog House Size Charts – 440 breeds with recommended minimum sizes for your dog house, including doorway size and floor space.
- Making a wood plank dog house – the video and article
- Wood Materials for building your dog house – Know which woods are bad for your dog and which are safe.
- Best Solutions For How To Insulate A Dog House Cheap
- Dog House Building Materials Basics
- Roof Guide – Roof Types, Roof Materials, And More!
- The Best Dog House Solar Projects
- Air Conditioner Guide
- Dog House Heater Solutions
- Dog House Fundamentals
- How To Properly Size A Dog House
- Waterproofing Your Dog House
Dog House Video Channel
- The Mobile Dog House – Dog House Reno – Episode 1 – Enter The Mobile Dog House – How to install a set of wheels on your dog house to make it mobile.
- Insulating a Dog House – Dog House Reno – Episode 2 – Insulating a Dog House – How to install a double layer of insulation and an all-weather carpet to make the dog house warm and cozy for your dog.
- Strip Curtain Dog House Door – Dog House Reno – Episode 3 – Making a Strip Curtain Dog House Door – How to make a double layer strip curtain for your dog house door and install it.
Other Articles In Dog House Times
- 25 Best Dog Breeds For Outside Life
- Snow Salt and De-Icers- The Bane in Every Dog’s Winter Existence
- Making a Strip Curtain Dog House Door
- Cardigan Welsh Corgi Dog Breed Information
- Portuguese Waterdog Breed Information
- The Top Dog House Types For Each Climate
- Why Are Dogs Noses Wet?
- Basenji Dog (Breed Information)
I hope you liked the plans and found them helpful. Leave me a comment and let me know what you think. I’d love to hear from you.
Return to Home * About Dog House Times.